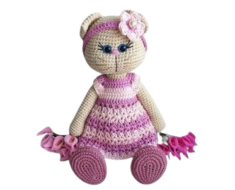
Hello dear Amigurumi Knitting Lovers
Today we share a free amigurumi crochet pattern for you. As you know, we share new amigurumi free patterns every day. master crochets, amigurumi gazelles, amigurumi bears, amigurumi pola, amigurumi pandas, amigurumi penguins, amigurumi giraffes, amigurumi lama, amigurumi pigs, amigurumi rabbit, amigurumi clowns, amigurumi dolls, amigurumi unicorn, amigurumi elephants, amigurumi unicorn , amigurumi hippos, amigurumi monkeys, amigurumi cats, amigurumi dogs and more…
Today, the new daily crochet pattern Amigurumi, Cute Bunny Free Crochet Pattern , I want to give you some information about this pattern;

Materials
- White, grey, lead, light pink and dusty pink cotton.
- safety eyes 6mm
- Crochet 2.2mm
- 2 pink buttons 1 cm
- pink floss
- pink ribbon
- Synthetic cotton for padding
- Blunt embroidery needle
- dot marker
Head
Row 1: Using white in 1 amigurumi ring , make 6 sc/6 sts.
Round 2: Increase by 1 sc in each st / 12 sts.
Row 3: (1 sc, 1 inc) x 6 times / 18 sts.
row 4: ( 2 sc , 1 inc ) 6 times / 24 p
Row 5: 1 sc, 1 inc, (3 sc, 1 inc) x 5 times, 2 sc/30 sts
Row 6: (4 sc, 1 inc) x 6 times / 36 sts.
Row 7: Leave 36 sc.
Row 8: (5 sc, 1 inc) x 6 times / 42 sts.
Row 9: leave 42 sc.
Row 10: (6 sc, 1 inc) x 6 times / 48 sts.
Row 11: (7 sc, 1 inc) x 6 times / 54 sts.
Row 12: (8 sc, 1 inc) x 6 times/60
13th row: 60 sc.
Row 1 4: ( 9 m p, 1 ai m) × 6 times / 6 6 p
Rows 15 to 23: Leave 66 sc.
Row 24: (9 sc , 1 dec) x 6 times / 60 p.
Rd 25: leave 60 sc.
Place safety eyes between rows 9 and 10 at 14 stitches.
Row 26: (8 sc, 1 dec) x 6 times / 54 p.
Rda 27: save 54 points
Row 28: (7 sc, 1 dec) x 6 times / 48 p.
Row 29: (6 sc, 1 dec) x 6 times / 42 p.
Rd 30: (5 sc , 1 dec) x 6 times/36 p. Synthetic cotton filler
Row 31: (4 sc, 1 dec) x 6 times/30 sts.
Row 32: (3 sc, 1 dec) x 6 times/24 p.
Row 33: (2 sc, 1 dec) x 6 times/18 sts.
row 3 4 : ( 1 sc , 1 Dec ) × 6 times / 1 2 p
Finishing the series also fill With cotton synthetic .
Row 35: make 1 cut for each stitch / 6 tbsp. Close with a needle.

Make ears 2
Rda 1: With white color. You will start by making 4 chain stitches, then work the second chain stitch from the yarn over, then into the last ch. do 6 sc. You will crochet the bottom of the chain, then 2 sc and again 6 sc in 1 ch/16
Row 2: 4 sc, 2 inc, 6 sc, 2 inc, 2 sc / 20 p.
Row 3: 5 SC, 2 inc , 8 SC, 2 inc , 3 SC / 24 loops
row 4 : 6 sc 2 inc, 1 0 sc , 2 inc 4 sc / 28p
Row 5: 7 sc, 2 inc, 12 sc, 2 inc, 5 sc / 32 sts.
Row 6: 8 sc, 2 inc, 14 sc, 2 inc, 6 sc/36 sts.
Row 7: 9 sc, 2 inc, 16 sc, 2 inc, 7 sc/40 sts.
Rows 8 to 12: Leave 40 sc.
Row 13: 11 sc, 1 dec, 18 sc, 1 dec, 7 sc/38 sts.
p gives 1 4:38 sc
Row 15: 9 sc, 1 dec, 17 sc, 1 dec, 8 sc/36 sts.
Row 16: Leave 36 sc.
Row 17: 9 sc, 1 dec, 16 sc, 1 dec, 6 sc/34 p.
Row 18: Leave 34 sc.
Row 19: 8 sc, 1 dec, 15 sc, 1 dec, 7 sc/32 p.
20th row: leave 32 sc.
21st row: 8 sc, 1 dec, 14 sc, 1 dec, 6 sc/30 st.
Road 22: leave 30 sc.
23 row: 7 sc, 1 dec, 13 sc, 1 dec, 6 sc/28 sts.
Row 24: Save 28 sc.
Row 25: 7 sc, 1 dec, 12 sc, 1 dec, 5 sc/26 sts.
Row 26: Leave 26 sc.
Row 27: 6 sc, 1 dec, 11 sc, 1 dec, 5 sc/24 p.
Row 28: Leave 24 sc.
Row 29: 6 sc, 1 dec, 10 sc, 1 dec, 4 sc/22 sts.
Row 30: Save 22 SC.
31st row: 5 sc, 1 dec, 9 sc, 1 dec, 4 sc/20 st.
Row 32: Leave 20 sc.
Rd 33: 5 sc, 1 dec, 8 sc, 1 dec, 3 sc/18 st.
Row 34: 18 sc
Rd 35: 4 sc, 1 dec, 7 sc, 1 dec, 3 sc/16 st.
Row 36: Leave 16 sc.
Row 37: 4 sc, 1 dec, 6 sc, 1 dec, 2 sc/14 sts.
Row 38: Leave 14 sc. Insert a stitch into the next stitch, close and cut. leaving a long tail to attach it to the head.

soles
do 4
Row 1: in light gray ch 6 and from the second stitch from the yarn over make 4sc, 3sc in the same stitch, 4sc, 3sc in the same stitch / 14st.
Row 2 : 4sc, 3inc, 4sc, 3dc/20pt
Row 3: 4sc, (1sc – 1inc) x 3, 4sc, (1sc – 1sp) x 3/26 sts.
p gives 4: 5 sc , 1 inc , 2 sc, 1 inc , 2 sc, 1 inc , 6 sc , 1 inc , 2 sc, 1 inc , 2 sc, 1 inc , sc / 32
Row 5: 5 sc, 1 sc, 1 sc, 1 sc, 4 sc, 1 sc, 1 sc, 1 sc, 6 sc, 1 sc, 1 sc, 1 sc, 4 sc, 1inc, 1sc, 1inc, 1sc / 40 p.
Round 6: 7 sc , 1 inc , (2 sc -1 inc )x3, 1 0 sc , 1 inc , (2 sc – 1 inc ) x 3, 2sc / 48
7th row: make 48 slip stitches, taking a purl loop from the 6th row, close with a needle.
/ 48 points

Union of soles: You need to place both parts with the wrong side facing you and cut a piece of cardboard or mica of such size to put between them. Use light pink stitch to join in stockinette stitch, taking the front stitch of each piece. Cut and stitch in sit with tying with a needle.
The part of the shoe is dusty pink, join the dusty pink thread into the second half-loop, which is located between the incs (in the middle of the heel), knit with a purl loop in stockinette stitch in the circle.
p gives 1 To 4: 48 m p / 48 p
Rda 5: 13 sc , 22 sc , 13 sc /48 pt
Row 6: 13 sc, 11 sc, 13 sc/37 sts.
Row 7: Place a marker on the front stitch and change the color to white while weaving in the BACK STITCH. Save 37 stitches by knitting them in single crochet stitches.
Rda 8: 11 sc , 13 sc , 13 sc / 37 points.
Row 9: 10 sc, 8 sc, 11 sc/29 dc.
Row 10: 9sc, 8sc, 12sc / 29 sts.
Row 11: 10 sc, 4 dec, 9 sc, 1 dc / 24 pt. Row 12: 9sc, 3sc from sc, 9sc / 21st
Row 13: leave 21 sc/21 sts. Shoe padding and part of the sock
You should then complete the following sequence, working through a knit stitch (3 ch, dc in next stitch) repeat 21 times. Close, trim and thread the thread with the needle. This is the reversal of the sock.
Pick up the marker on the 7th row and inc work 11 st sc, 6 ch, st sc in the same stitch as before, 4 st sc, 6 ch, st sc in it, 8 st sc, 6 ch, st sc in it. 4 dc, 6 chain stitches, dc sb, 10 dc sb. Close with a needle and trim, hiding the thread.


Slide the ribbon onto the shoe, using the existing chains as a button loop.
Now we will start knitting the leg through the back loop from the 13th row. color to steel gray.
Leg
p gives 1 4: person have This is with two 1 p cough with n point or ra you
Row 15: Purl stitch in stitch, leaving 21 stitches. Rows 16-39: Save 21 sc/21 stitches. Fill the leg.
r d 40: (1 sc – 1 dec ) × 7 / 14
rd 41: 7 Dec / 7 The series also ends fill with filler Close featuring needle , cut g care long inc, in order to then attach to the body.

Body
Row 1: Braid steel color 7sc into magic ring / 7p. Round 2: 7 inc / 14 points
Round 3: (1 sc – 1 inc) x 7 / 21 sts. 4: (2 sc – 1 inc) × 7 / 28 Rda 5 pt: ( 3sc -1 inc ) x 7/35 pt
Row 6: 2sc, 1inc, (4sc – 1dc) x 6, 2sc / 42 sts. Row 7: (5sc – 1sp) x 7 / 49 sts.
Road 8: keep 49 sc/49 p.
Row 9: 3sc, 1inc, (6sc – 1dc) x 6, 3sc / 56 p.
Rd 10-17: keep 56 sc / 56 p.
Change the color to light pink and work in stockinette stitch in the round / 56 sts.
Row 18: Inc 56 sc to sc through knit stitch BACK stitch/56 st.
Road 19-23: keep 56 sc / 56 p.
Row 24: 3sc, 1rm, (6sc – 1dc) x 6, 3sc / 49 sts.
Rows 25 and 26: save 49 sc / 49 sts.
Row 27: (5sc – 1 dec) x 7/42 sts.
Rd 28-30: keep 42 sc/42 p.
Row 31: 2sc, 1dc, (4sc – 1dc) x 6, 2sc / 35 sts.
Row 32 to 3 4:35 sc / 3 5 p
Rda 35: (3 sc -1 dec ) x 7/28 pt
Rows 36 and 37: save 28 sc / 28 sts.
Row 38: switch to white and knit in stockinette stitch through a purl stitch, maintaining 28 sc/ 28 points
Row 39: Inc work SC through BACK stitch of slip stitch, leaving 28 SC/28 stitches.

flowers
Make 2, one of each color.
Using lead color steel weave 30 ch, rise 2 chain heights and from the fourth chain weave 29 sl-st, close with stockinette stitch and leave a long tail for incision.
Use gray weave to weave 24 air loops, rise from 2 ch in height and from the fourth air loop weave 23 sl-st, close with stockinette stitch and leave a long tail for incision.
Hands
Knit two using white and light pink
Rda 1: with white color in magic ring 7 sc /7
Round 2 7sc /7
Round 3: ( sc – 1 inc ) x 7 / 21
Row 4-7: inc continue to work 21 sc / 21 st.
Row 8: 6sc, 1 inc of 4 double crochets, 14 sc/21 sts
Road 9: 4sc, 2dc sc, 7sc, 2dc, 2sc/17st
Rows 10 and 11: leave 17 sc/17 sts.
12th row: 5 sc, 1 dec, 6 sc, 1 dec, 2 sc/15 st.
From 13th to 27th row: leave 15 sc/15 sts. Fill half hand with synthetic cotton.

Row 28: Change color to light pink and inc 15 single crochet, then inc 15 single crochet. purl loop / 15 tbsp.

Rows 29 and 30: continue to knit 15sc.
Close with satin stitch and leave a long end for incision.
planter
We’ll start by making the planter bib. Let’s take the colors steel gray, pink transparent, beige and light gray.
Rda 1: With steel gray bayonet mount in 8 mp magic ring. Close with a slip seam
on the first evening Cut / 8 points
2nd row: In light pink inc join any SC from the inc of the previous row and inc work the 2nd ch and then knit. dot a pineapple of 2 braces, then 3 h from separation. Then follow the following sequence (1 pineapple point from 3 double crochets, ch 3 interval) 7 once, close with sc to the second chain from the beginning. Cut.

Row 3: Use raw color to connect anywhere 3 ch in the next row. Think 3 ch, 2 ch in the same space, 3 sc in the next space 3 ch, 3 ch in
next ch 3 in space, ch 3 separately, ch 3 in same in space (you will be making a corner that has 6 double crochets 3 ch separately), 3 sc,
to the next place, 3 ch to the next inspace ch 3 from each other, 3 ch to the same place, 3 sc to the next inspace, 3 ch to the next inspace 3 ch from
division, 3 ch in the same incspace, 3 sc in the next incspace, 3 ch in the next incspace at a distance of 3 ch from each other and connect with a half-column in the third ch in height. Don’t cut in sit down
Rda 4: Do 1 sc for each point, in incspace 3 cad you should do 3 mp, not over the chain point. Cut out.
5th row: In light gray, fasten inc in the second SC of any corner and inc 2 ch, inc 1 var in the same base of 2 ch, then inc 15 inc var, inc 1 stitch and make a slip stitch. In the next loop, drop 2 sc, inc, knit 15 ch. Cut

Now let’s start weaving flowerpot pants. For this you will use a light gray color and make 24 ch. Now we will connect the chest with half columns, for this we will use some of the available thick color. You will make 2 single crochets in the last double crochet in light grey, you should incwork these 2 double crochets on the side of the double crochet, 11
Dc in the light gray part, 2 dc in 2 ch at the beginning of the double crochet (first light gray circle) and 24 ch. Close with stockinette stitch into a ring / 63 sts.
Row 1: rise with 2 ch, in the next stitch make 1 ch and 1 inc. Then knit the following sequence (2 inc, 1 inc) repeat 20. Close with stockinette stitch in a row. second ch from the beginning. Cut / 84
So that there is no height line left, we will cut it off and fasten a new one, this will give a more accurate finish.
Row 2: Secure with beige anywhere on the back and center of the trousers, rise with 1 ch in high, 1 ch apart and inc 1 st, then repeat the following sequence (1 sc, 1 ch in inc and inc 1 sc) x 40. Close point slipped in high ch and cut. / 84
Row 3: Secure in light gray anywhere in the back and center of the trousers, go up with 1 ch in high, 1 ch in open and inc 1 st, then repeat the following sequence (1 sc, 1 ch in open and inc drop 1 p) x 40, Close the point slipped in high ch and cut. / 84

You must repeat the 2nd and 3rd rows until the 14th row, which should be ecru.
Now let’s divide the legs, to do this you must divide the part into 2, leaving half as close to the center of the chest as possible. You must leave 21
light beige SC on each leg. You should then place the piece with the chest down and facing you, secure in a ch in space of light gray in the middle of the side that faces you and you should make a chain 3 , then a double crochet stitch
half of the side that was left out. Here you will separate the pants into
we form the legs.
See photo for more details.
Chains separating legs

We knit each leg separately according to the same pattern.

pant legs or n
Each leg is knitted the same way, so we’ll only explain 1. leg, which you must knit to get both.
Row 15: From the stockinette stitch that you made to connect and thus separate the piece, you will inc continue knitting with the yoke facing out, that is, you will knit the inc leg, doing the following sequence (1 ch, inc 1 st, 1 sc) x 22 times . Close slip st.
in height gl. / 44
Row 16: Secure with light brown thread anywhere in the back and center of the leg, make 1 ch in, 1 ch apart and inc 1 stitch, then repeat the following sequence (1 sc, 1 ch in inc and inc 1 stitch) x 21 . Close involving a slip stitch in high vp. and cut. / 44
Repeat rows 15 and 16 until you reach row 19, which should be grey. Don’t cut.
Row 20: Make 1 SC for each SC in the previous row, i.e. you need to lower the chains inc. / 22
Round 17: Turn the fabric. We will knit from the wrong side of the product, that is, you will knit with the hole for the trouser leg towards you, but knit with the side that is outward, and not
the side closest to you. You take a purl stitch from round 17 and do a point round. slipped. Cut. / 22
Row 18: Change the color to light gray and you will make a circle of single crochets, also purling and taking up the purl stitch of the light gray single crochet you made earlier. /22
Rda 19: Turn the weave, you will weave with incava. Go up with 2 ch in height and then inc through knit stitch, 1 ch in each stitch, bind off with stockinette stitch in second ch. in height. / 22
Row 20: Finally, you will make a row of knit stitches, taking a purl stitch.
row 19. Close with a needle and cut.
Suspender
With light gray you need to make 34 ch, then in the fourth ch from the crochet make 1 double crochet, and continue knitting 29 stitches. you will have 1 left h affordable and on her you must weave 6 double crochets which will make your fabric spin and you must weave at the bottom of the starting chain. Knit 31 ch. Close with removed st. and cut.
Strap edge: it is necessary to make 2 types of edges so that when mounted in the seeder they are opposite.
Strap 1: change to ecru color. Anchor in the second high ch. at first
inc next round. *Ch 2 up, mv 1 in the same loop, inc drop 1 loop and fasten with a slip loop in the next loop* repeat 15 times. Then 2 ch, 1 sc in the same stitch, 2 ch and 1 sc in the same st. You will now begin to knit stitches along the back stitch until the piece is complete.
Strap 2: Make 31 slip stitches in ecru and then start weaving
next sequence * 2 replace, make 1 msc in the same loop, inc skip 1 loop and fasten dc loop in the next loop * 16 times
See image below for details.

Connecting the straps to the planter: You will place the straps with the wraps inward, leaving a 5-st space between each strap. You will then knit beige stitches with slip stitches to connect the slats to the planter. For each bar you will need to make 6 slip stitches, then complete the outline V front. When be on chest, you need to make 1 long SC in the central part so that there is separation
(see photo) and return to the starting point where you started. Close with a needle and cut.

armed
1.- You must place the legs inside the planter and then connect them to the body, positioning them at the height of the color change. Using a steel gray needle, incline 1 leg, torso and the next leg, then return the needle to another point and incline in reverse order. Once you return to the starting point, you can pull the threads and you will see how your legs will adjust. You have to adjust what is necessary to incite the rabbit’s firmness so that he can stand up, and also allow him to put the planter down without any problems.

2.- Head to body:
To connect the head to the body, you must place the neck between the 9th and 15th circles of the head, it should be in the center. Then use a needle and white cotton to connect dot by dot. Before close fully it happens synthetic cotton filling neck for greater rigidity.
- Eye Detail: Insert the needle into the left eye (top stitch), then exit into the left eye at the top inner part, then you should insert the needle
at another point (bottom) and go out to the left eye (bottom stitch). Make a knot with both strands and press until you get the expression.
- Ears. Place them on the sides of the head between rows 21 and 26.

3.- Hands to the body. Place them side by side with your thumbs and, leaving the light pink circle free (see image), inc stitch with the remaining free thread.

flower yes: or bicarlas Come in wave 1 5 and also 1 8 on in oh or I’m left.
Buttons on the strap. They are sewn onto each strip and the holes of the square bib serve as an earpiece to open and close the seeder.
Nose: Between rows 4 and 5 of embroidery thread you should make 4 stitches, leaving 6 stitches ra sl-st apart, then stitch below the nose and in the center until you reach the 2nd row, but counting towards the other sides of the nose.